Friday, August 28, 2009

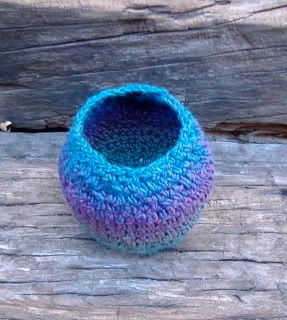
Crochet Bowl ~ Pre-Felted Stage

Wanting to get an interesting shot of my Karaoke yarn by SouthWest Trading Company, I decided to have a photo shoot at Starbucks one evening. A friend was kind enough to loan me her coffee before she took a sip so I could try to grab some shots of my yarn. If I remember correctly she took this particular picture with her cell phone and sent it to me the next day. (Thanks Dawn!)

Karaoke is a worsted weight yarn, 10 ply (9wpi), 109 yards per skein. This particular colorway is #278 Mermaid. I purchased this 50% SoySilk/50% Wool yarn from Jimmy Beans Wool. As mentioned in a previous post I originally purchased these 4 skeins early in my knitting adventure thinking I would use this yarn for a Clapotis. It would have been very pretty but I soon decided I would be happier using it for knitted bowls.

When I learned to crochet I decided I wanted to see what crochet looked like felted. I chose Caffeinated Crafter's pattern for a felted bowl. She recommends starting with a "Magic Circle" and recommends tjw1963's video on You Tube:


I started my bowl with the Magic Circle and loved the ease of it. You also need to know how to decrease or sc2tog. The Caffeinated Crafter recommends the following video by KawaiiGurumi:


Here are two pictures of my bowl before felting. I need to do some more felting and will show the felted bowl in a future post.


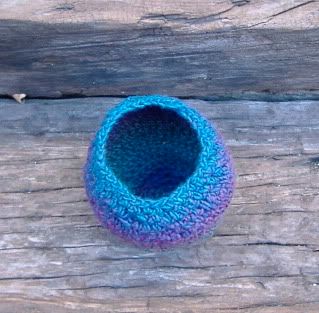
I actually think I like the bowl better in the pre-felting stage. Maybe when I finish the felting I will like it better. I ran out of time while felting and so let it dry for now. I hope to come back to it by next weekend. I was so busy when I started to felt it and it was taking cycle after cycle (more than I had to with my knitted felting), so I put it in "time out" for awhile.


Sunday, August 23, 2009

Polished Stone ~
{The Marriage of Alcohol Inks and Glossy Paper}

Where do the days go? It seems like I blink and it's Monday all over again! Before my weekend is but a memory, I wanted to make sure I carved out some time to blog. I apologize for the long delay. I spent some of my time trying to get decent shots of Polished Stone over multiple days and finally settled on these pictures as the best my camera could do. (Perhaps it could do better, but I chose to say "enough already!" due to a thing called "time.") I rejected quite a number of pictures. Polished Stone is one of those things that you have to see in person to get the full effect.

I used Ranger Adirondack Alcohol based re-inkers, Adirondack Blending Solution, Blending Tool with felt and glossy card stock.


The felt piece can be "washed" with rubbing alcohol (or the Blending Solution) to "clean it" a few times. You will know when you need to toss the felt and replace it with a clean one.

The spray bottle contains alcohol and the black container has Kosher salt in it.

In the bottom sample on this picture after the ink was applied and blended, I lightly sprayed the paper with alcohol and dropped some Kosher salt around. Leaving the salt to dry on the paper for awhile, the salt interacted with the ink and added an interesting look. This is a watercolor technique some of you may have used before.


On the next two samples and the bottom sample in the top picture, I used Stream, Wild Plum and Butterscotch (pictured above in the photo of the supplies). Ranger sells them in a package of three and the colorway (using a fiber term) is called "Nature Walk." By varying the amount of one color over another and the amount of Blending Solution you can come up with light or dark.


I used one drop of Adirondack Silver Metallic Mixative on this one. You can see 1 drop goes a very long way. I was using someone else's reinkers at this point and did not have the chance to write down the colors.

Here's one way to use Polished Stone. I was using someone else's stamps so I apologize that I did not make notes on the stamps used. This is the outside and the envelope. I always like to tie the envelope and card together in some way. For this card I chose to stamp part of the swirl stamp on the front and back of the envelope. I used embossing powder on the swirl stamped image on the card, but did not emboss the design on the envelope.


I also wanted to tie the front of the card in with the inside, so I included a couple of small strips of polished stone.


Here's a video by Tim Holtz of Ranger Industries demoing the technique. Enjoy!


For those who arrived here in hopes of a "fiber fix," there will be fiber content next time!